
Building Your File
Building Your File
Step 1: Choose your Design/Layout program(s)
Choosing the right program for designing your project is key. Follow these guidelines when choosing
the programs you will use.
Adobe Photoshop
• For photographs and rasterized images only.
• Text is best left to other applications like Illustrator or InDesign.
• When using Photoshop it is NOT recommended to enlarge images because this will result in
pixelated images and poor print quality.
Adobe Illustrator
• Illustrator works with vector images which are based on mathematical formulas. This means
images created in Illustrator can be scaled up or down without loss of quality, as can happen with
rasterized images in Photoshop.
• Illustrator is great for text that will be used as a design element, or logos.
Adobe InDesign
• This is a layout program that is used to combine text and graphics.
• It is best to compose large areas of text in InDesign rather than Illustrator or Photoshop.
• Place images designed in Photoshop or Illustrator into your InDesign layout to bring everything
together and get it ready for print production
Microsoft Word
Word can be useful when creating large bodies of text, however as a design/layout tool it is not
nearly as powerful as InDesign. If your product is going to have images we do not recommend
using Microsoft Word as your primary design tool because quality can be a concern. In addition,
when Word documents are opened on different computers, with different operating systems or
different versions of Word, the layout could be changed, fonts may not appear correctly and images
mayhavelostquality.ForthesereasonswerecommendusingInDesignfornallayoutpurposes.

About Bleed
Why is adding a Bleed necessary?
Small mechanical variations can end up leaving a white edge where
there should be no white edge if the image is not extended beyond
thenaltrimsize.Extendingimages1/8”beyondthenaltrimsize
guarantees that images truly will print to the edge of the paper.
How do I add bleed to my design?
Buildyourles1/8”largerthanthenaltrimsize.Forexample,ifyouhavedesignedastandard3.5”
x 2” business card with a red background covering the whole area, you will need to enlarge that red
background to 3.75” x 2.25”. This will make the red background extend 1/8” on every side of the
page.
Adobe Photoshop
1. Open Photoshop and click File > New...
2. Enter the full bleed
4
dimensions. That is, 1/4” extra both vertically and horizontally.
3. Set the Resolution at 300 pixels/inch
4. Set your Color Mode at CMYK
Adobe Illustrator
1. Open Illustrator and click File > New...
2. Enter the trim
5
dimensions in the Width and Height boxes (for example, the trim dimension on a
standard business card would be 3.5” x 2”)
3. Enter 0.125 for the top, bottom, left and right bleed
4. Set your Color Mode at CMYK
5. Set your Raster Effects at High (300ppi)
Adobe InDesign
1. Open InDesign and click File > New > Document...
2. Enter the trim dimensions under Page Size (for example, a standard business card would have
trim dimensions of 3.5” x 2”)
3. If you do not see “Bleed and Slug” at the bottom of the window, click the “More Options” button.
4. Enter 0.125 for the top, bottom, left and right bleed
Trimming & Bleed Guidelines
Whenbuildingyourle,pleasefollowtheguidelinesbelowtoensureyourprojectisprintedcorrectly.
Trim Edge
Thisistheedgeofthenalprintedproduct.Forastandardbusinesscardthetrimdimensionswould
be 3.5” x 2”
4. Set your Color Mode at CMYK
2
Adobe Illustrator
1. Open Illustrator and click File > New...
2. Enter the trim dimensions
3
in the Width and Height boxes (for example, the trim dimension on a
standard business card would be 3.5” x 2”)
3. Enter 0.125 for the top, bottom, left and right bleed
4. Set your Color Mode at CMYK
5. Set your Raster Effects at High (300ppi)
Adobe InDesign
1. Open InDesign and click File > New > Document...
2. Enter the trim dimensions under Page Size (for example, a standard business card would have
trim dimensions of 3.5” x 2”)
3. If you do not see “Bleed and Slug” at the bottom of the window, click the “More Options” button.
4. Enter 0.125 for the top, bottom, left and right bleed
Keep in mind:
• For Saddle-stitched (stapled) booklets: Build your document to have reader’s spreads with facing
pages
• For Perfect-bound or Wire-bound books: Build as single pages
Step 3: Watch Out for Common Mistakes
See Common Mistakes in Print Design to learn what common print design mistakes to avoid so your
nalprintedpiecewillbe100%successful!
About Bleed
What is Bleed?
Inprintingterms,“bleed”referstoanarea,usually1/8”oneachside,beyondnaltrimsize,into
which images are extended.
2 See Common Mistakes in Print Design
3 The trim dimension is the final size of a product before any folding is applied. For more information see Trimming & Bleed Guidelines
3.5” x 2” Business Card
1/8” Bleed
Product Specication Quick Sheet
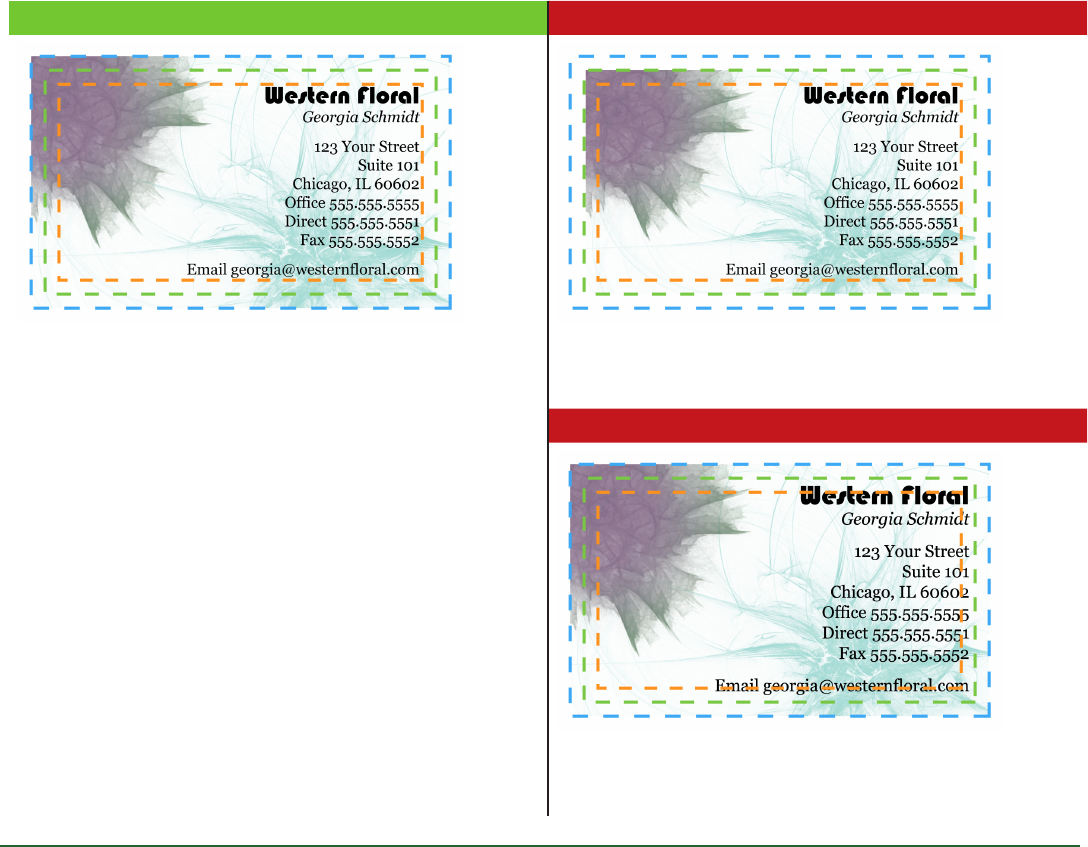
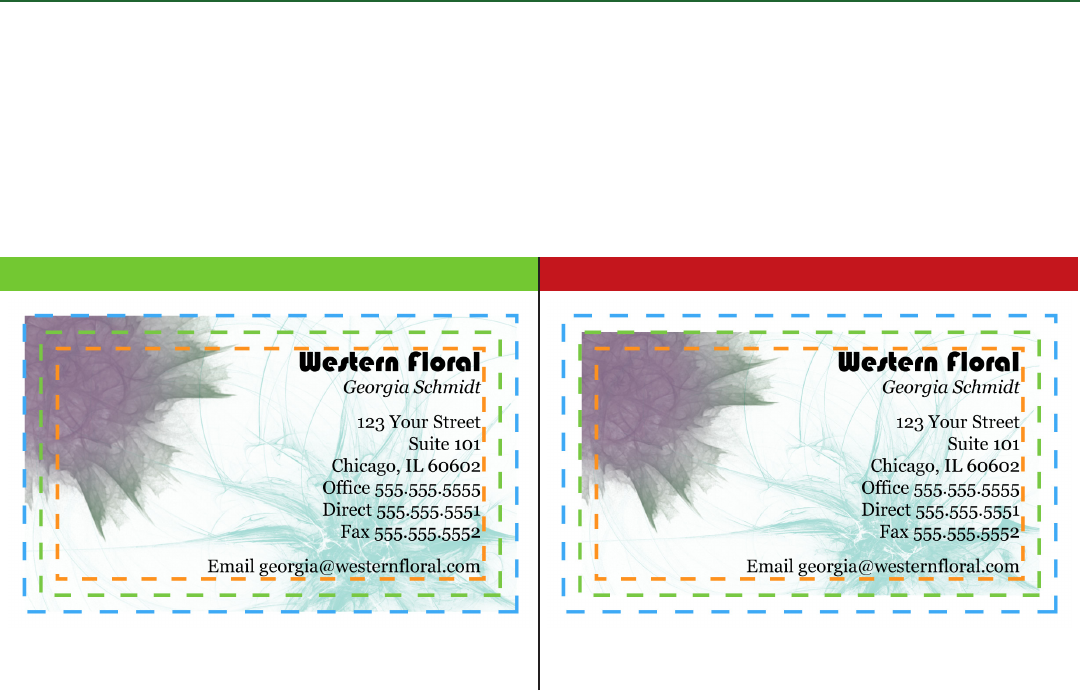
Bleed Edge
Images should be pushed out to the Bleed Edge, 1/8” past the trim edge on every side.
Safe Edge
Text and other important elements should be placed within the Safe Edge which is 1/8” inside the
Trim Edge. This will ensure that no text is cut off due to variation in the trimming process.
Examples
Correct Incorrect
The background image has been extended 1/8” past the
Trim Edge and the text is within the Safe Edge.
The background image has not been extended to the
Bleed Edge. This could result in strips of white around the
edges of the business card.
Incorrect
The text has not been kept within the Safe Edge. This
could result in text being cut off due to tolerances during
trimming.
Guidelines for Images and Color in Printing
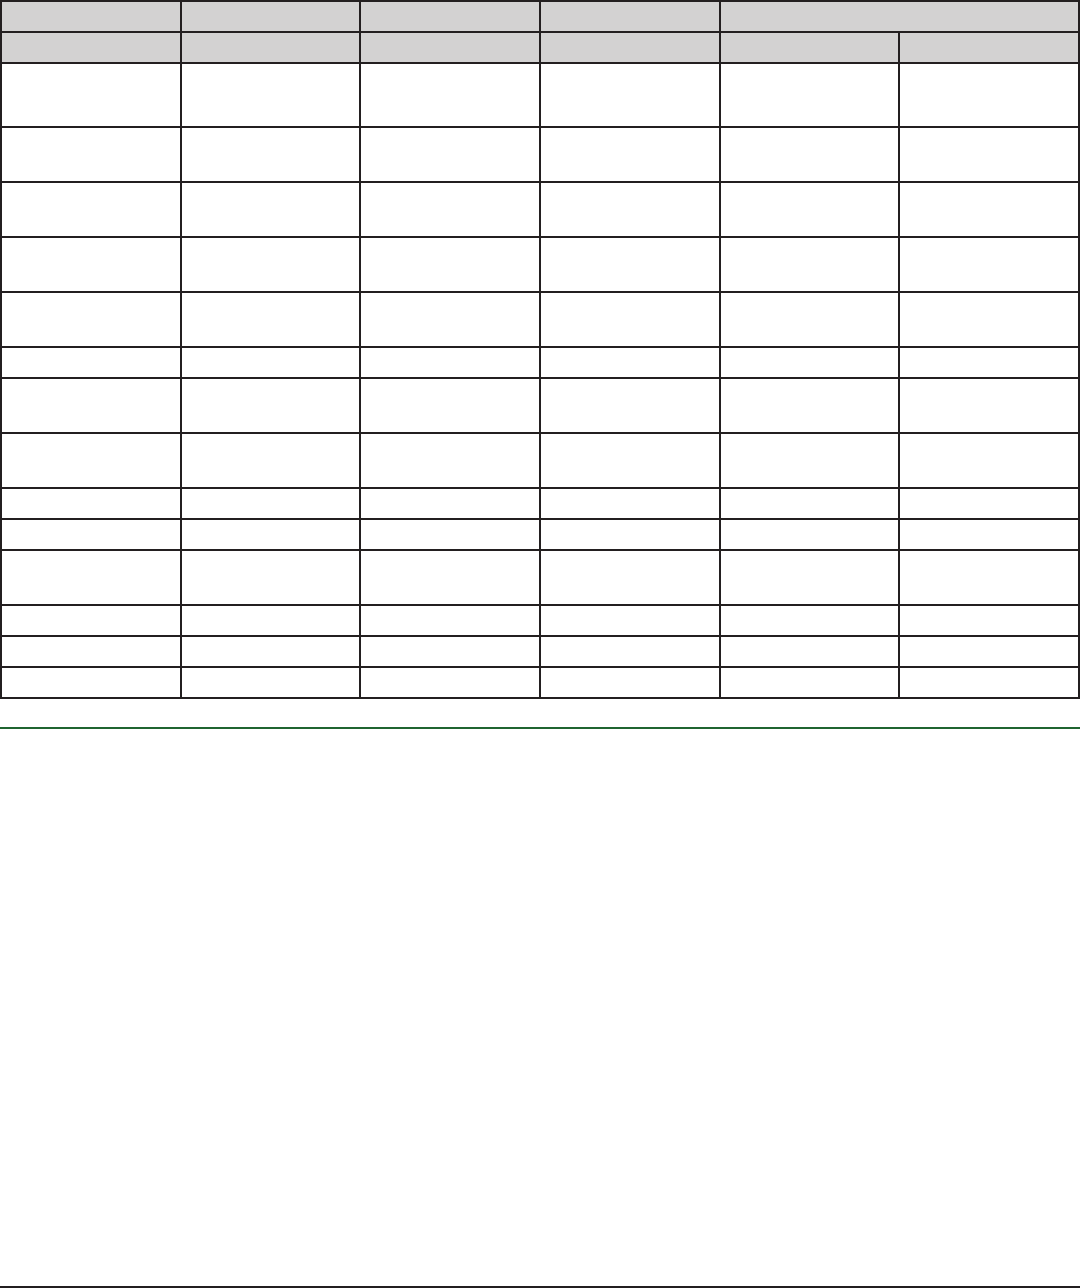
Product Flat Size Bleed Resolution Submit Size
W x H Inches Pixels
Tri-Fold
Brochures
8.5” x 11” .125” 300dpi 8.75” x 11.25” 2625 x 3375
Half-Fold
Brochures
8.5” x 11” .125” 300dpi 8.75” x 11.25” 2625 x 3375
4x9 Half-Fold
Brochures
8” x 9” .125” 300dpi 8.25” x 9.25” 2475 x 2775
Standard
Business Card
3.5” x 2” .125” 300dpi 3.75” x 2.25” 1125 x 675
Envelopes (No.
10)
9.5” x 4.125” 0 300dpi 9.5” x 4.125” 2850 x 1238
Flyers 8.5” x 11” .125” 300dpi 8.75” x 11.25” 2625 x 3375
Greeting Cards,
Fold Down
6.25” x 4.5” .125” 300dpi 6.5” x 4.75” 1950 x 1425
Greeting Cards,
Side Fold
4.5” x 6.25” .125” 300dpi 4.75” x 6.5” 1425 x 1950
Letterheads 8.5” x 11” .125” 300dpi 8.75” x 11.25” 2625 x 3375
Post Cards - 6x4 6” x 4” .125” 300dpi 6.25” x 4.25” 1875 x 1275
Post Cards -
5.5x3.5
5.5” x 3.5” .125” 300dpi 5.75” x 3.75” 1725 x 1125
Posters - 11x17 11” x 17” .125” 300dpi 11.25” x 17.25” 3375 x 5175
Posters - 12x18 12” x 18” .125” 300dpi 12.25” x 18.25” 3675 x 5475
Rack Cards 4” x 9” .125” 300dpi 4.25” x 9.25” 1275 x 2775
Guidelines for Images and Color in Printing
Images
1. Resolution for all images should be at least 300 pixels/inch
2. Preferably,allimagesshouldbesavedto.epsles
3. Imagesthataretobeattheedgeofthepageshouldbeextended1/8”beyondthatnalsize
6
4. Images should be created in/converted to CMYK
7
, not RGB.
Vector Images (Illustrator)
ALWAYS“CreateOutlines”(Illustrator)or“RasterizeType”(Photoshop)toavoidfontissueswhen
submittinglesforprinting.Clickheretondoutmoreaboutcreatingoutlinesandrasterizingtype.
Pixel-Based (Photoshop)
• Avoidover-scalingimages(125%ormore)whenplacingintoyourlayoutprogram.
• Sampledown(reducethesize)acopyoflargerimagesandlinkthemtoyourletosavedisk
space and processing time.
All About Fonts
Color
• NEVER use RGB
• Alwayscreateorconvertalltext,images,andlestoCMYKorSpotColorvalues
• Avoidtransparencyeffectswhenworkingwithspotcolors
• Use the Pantone names for spot colors and avoid calling them things like, “Company X Yellow”
• Keep in mind that the colors you see on your screen may not match the printed result. Work with
your printer to make sure colors turn out the way you want them to.
All About Fonts
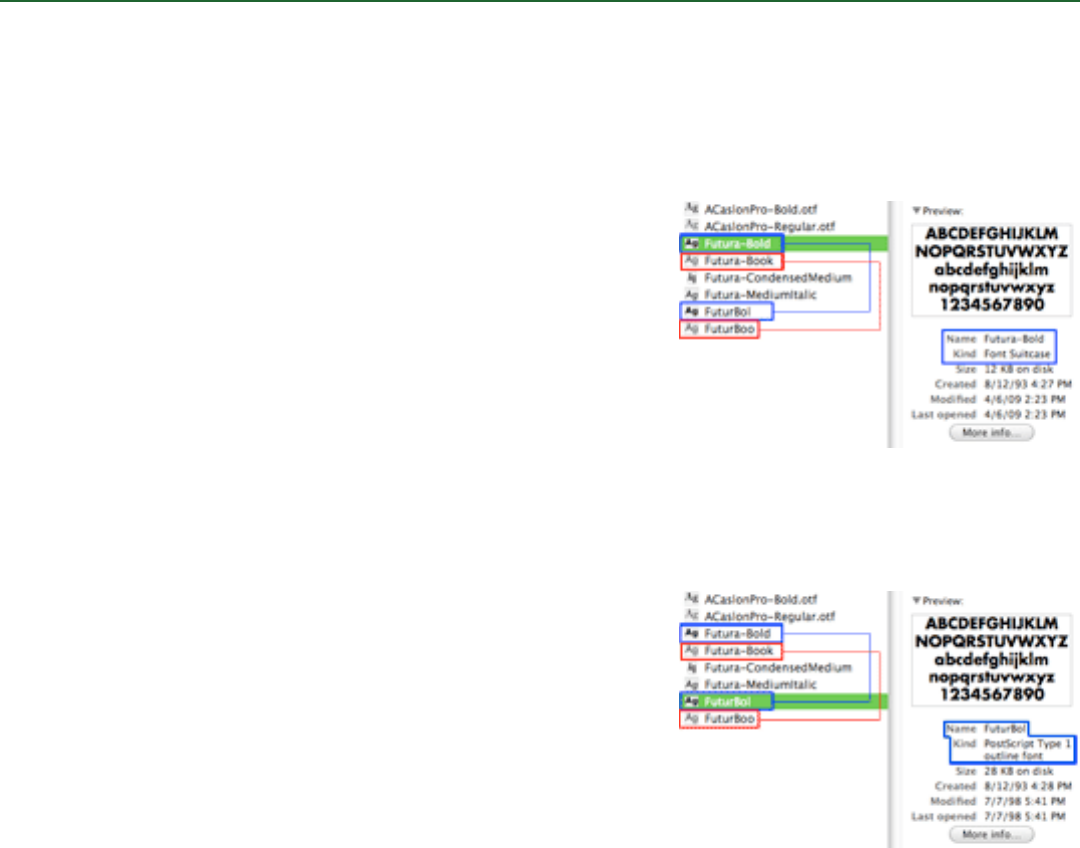
PostScript® Fonts
PostScriptfontshavetwoimportantles.Eachoftheselesmustbepresentinordertorenderthe
font properly both on screen and in print.
The “screen” font
The “screen” font is a font suitcase containing all the
information necessary to render a scalable font on your
computermonitor.Oftenthenameofthislewillbethefull
font name (Futura-Bold). In addition to this screen font you
must also include the linked printer font (the blue and red
lines show the relationship between two printer and screen
fonts).
The two “screen” PostScript fonts in this example are
Futura-Bold and Futura-Book.
Note: The description for the “Kind” attribute in the Preview
pane (on the right in the image) is “Font Suitcase.”
The “printer” font
The “printer” font contains vector outlines of the font and
is often named with an abbreviation of the full font name
(FuturBol). In addition to this printer font you must also
include the linked screen font (the blue and red lines show
the relationship between two printer and screen fonts).
The two “printer” PostScript fonts in this example are
FutuBo (linked to Futura-Bold) and FuturBoo (linked to
Futura-Book).
Note: The description for the “Kind” attribute in the Preview
pane (on the right in the image) is “PostScript Type 1
outline font.”
When you use a PostScript font in your design, make
sureyouincludeeachoftheseleswithyouroutput.ThisisquiteeasytodoinInDesign(see
Packaging in InDesign).
“Screen Font” : The Red and Blue lines show
the relationship between the two parts of the
PostScript fonts.
“Printer Font” : The Red and Blue lines show
the relationship between the two parts of the
PostScript fonts.

All About Fonts
TrueType® Fonts
TrueTypefontsweredesignedtoeliminatetheneedformultipleles.Theyincorporateboth
PostScriptfontsintoonele.
When packaging (see Packaging in InDesign)yourle,youwillnotseetwolesforeachfontas
you will when you use PostScript fonts. The two TrueType fonts used for this example are Futura-
CondensedMedium and Futura-MediumItalic
Note: The description for the “Kind” attribute in the Preview pane (on the right in the image) is “Font
Suitcase.” This is the same as with a PostScript font. To tell the difference between the two, see
“Knowing Which Fonts are PostScript, TrueType or OpenType” below.
OpenType® Fonts
OpenType was built on TrueType and also contains, in one
le,alltheinformationnecessarytorenderfontscorrectly
bothonscreenandinprint.It’smainbenetisthatitis
cross-platform.ThesamelewillworkonbothaWindows
and Macintosh system. OpenType fonts with the .otf
extension contain PostScript information while those with
the .ttf extension are TrueType-based. For more information
onOpenTypefontsvisittheAdobeFontswebsite:
http://www.adobe.com/type/opentype/
When packaging (see Packaging in InDesign)yourle,
youwillnotseetwolesforeachfontasyouwillwhenyou
usePostScriptfonts.ThetwoOpenTypelesusedinthis
exampleareACaslonPro-Bold.otfandACaslonPro-Regular.
otf.
Note: The description for the “Kind” attribute in the Preview pane (on the right in the image) is
“OpenType Font”
Knowing which fonts are PostScript, TrueType, or OpenType
You can tell what most font types are by looking at the extension.
Mac Windows
.ttf = TrueType .ttf = TrueType
.otf = OpenType with PostScript Content .otf = OpenType with PostScript Content
.dfont = a version of TrueType .pfb and .pfm = PostScript
No extension = PostScript (either screen or
printer)
.CompositeFont or .cff = compressed .pfb and.
pfmPostScriptles
.fon = For use in on-screen menus and Graphical
User Interface (GUI). NOT for printing
TrueType fonts will only be one le.
OpenType fonts are only one le and have a
.otf extension.

Packaging in InDesign
Packaging in InDesign
When using InDesign, a great way to make sure your printer will receive everything they need to
correctlyprintyourdocumentistocreatea“Package”containingallofthenecessaryles.Fonts,
images and other necessary items are put in one folder that you can easily send to your printer.
InDesigndoesthisautomaticallywithit’s“Package”function.TopackageyourInDesignle:
1. OpenyourleinInDesign
2. Click File > Package...
3. Go through the menu options on the left and check:
a.Fonts:AllthefontsyouwanttouseareinthelistandthestatusforeachoneisOK.Click“Find
Font...” if anything is missing.
b. Links & Images: Make sure each image type says “CMYK” and not RGB and that the status of
each image is “Linked.” We prefer linked, rather than embedded, images because it saves disk
space. If any of the images are missing, click on them in the list and then click “Relink”
4. Click the “Package...” button
5. Chooseadescriptivenameforthetextlethatwillbeincludedwiththepackage.Thislewill
containinstructionsforthePrepressteam.Itisalsohelpfulifyoullouttheotherrequested
information(Contact,Company,Address,Phone,Fax,Email).ClickContinue
6. Selectadestinationforthepackagedfolder(preferablythesamefolderyouroriginalInDesignle
is located in) and give it a descriptive name. Click Save.
7. Thepackagedfolderwillbecreatedinthelocationyouspecied.Makesureitcontains:
a.A.txtle
b.AnInDesignle
c.AFontsfoldercontainingallthefontsyouused(theremaybe“extra”fontsinthisfolder.See
“PostScript Fonts” above)
d.ALinksfoldercontainingalltheimagesyouused
8. Compress or “zip” this folder and send it to your Print Provider
More about the Package function
The Package dialogue box has several menu options that will help you ensure all fonts and images
are linked or embedded, and that the colors are correct. These options can help you locate issues in
your InDesign document you may not have been aware of.
Summary
Information about the document is displayed here, including any errors that are found (such as
images that are not in CMYK, missing fonts and images).
Fonts
This lists all the fonts that are used in the document. It tells you the name of the font, what type it is
(postscript,TrueType,etc),andifitispresentormissing.Ifthereareerrorsselectthespecicfont
and then click “Find Font...” to see available options. You can change the font in the “Find Font”
window, if you wish. Each instance of the original font will be changed to the new font you specify
in the “Replace With” section of the “Find Font” dialogue box.
Common Mistakes in Print Design
Links and Images
This section will tell you if there is anything wrong with your images. Make sure there are no
missingimages(ifthereare,selecttheimageandclick“Relink”tondtheimage).Ifyouhave
images that were created in the RGB color space, a warning will appear here. You can edit your
images in Photoshop or Illustrator and convert them to CMYK if you wish, or you can let your
printer’s Prepress department do this.
Colors and Inks
Process (CMYK) and spot colors are listed in this view. You should see Process Cyan, Process
Magenta, Process Yellow, and Process Black. If there are spot colors listed you may want to go
back to your document and convert those colors to process, unless your printer knows you intend
to use spot colors. You can change spot colors in your InDesign document by canceling out of
the Package window and right clicking on the spot color in the “Swatches” palette. Select “Swatch
Options,” then change the Color Type to “Process.” Go back to the Package window by clicking
File > Package...
Print Settings and External Plug-ins
These are a list of settings and plug-ins that are used in the document. They cannot be changed in
the Package dialogue box.
Formoreinformation,visitAdobeInDesign’sHelppage
Common Mistakes in Print Design
Everyone makes mistakes but Precision Images is dedicated to informing our customers about the
designandprintingprocesssoyouwillalwayshaveagreatprintedproduct.Avoidthefollowing
commonpitfallswhendesigningyourbrochure,businesscard,yer,oranyotherprintedproject.
Mistake 1: No Bleed
Besureyouextendimages1/8”beyondthenaltrimedge.Formoreinformationonthissee
Trimming & Bleed Guidelines and About Bleed
Correct Incorrect
The background image is extended to the Bleed Edge
(blue line)
The background image is NOT extended to the Bleed
Edge (blue line)
Common Mistakes in Print Design
Mistake 2: Text too close to the edge
Text and other important elements like logos should be placed no closer to the Trim Edge than 1/8”.
Correct Incorrect
The text is kept within the Safe Edge (orange line) The text is NOT kept within the Safe Edge (orange line)
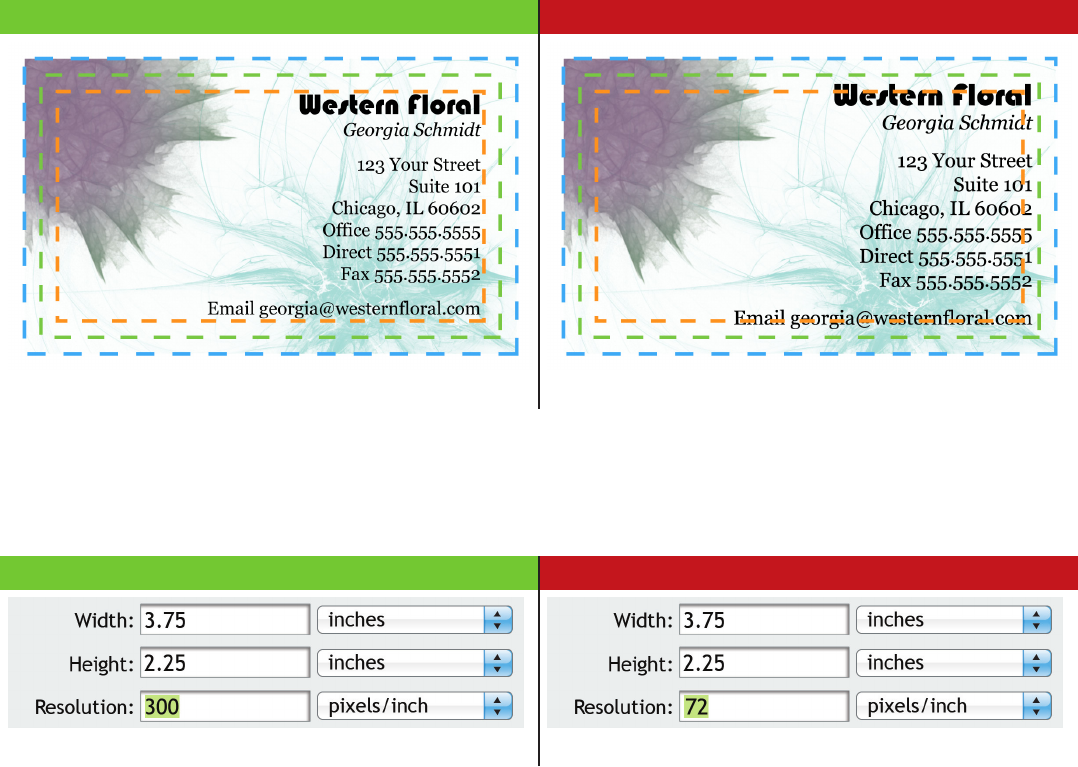
Mistake 3: Low Resolution
Theresolutionforanythingthatistobeprintedshouldbeatleast300dpi.Anythinglessthanthis
could result in pixelated images and fuzzy text. Images captured from the web are NOT suitable for
printed applications.
Correct Incorrect
The resolution is set at 300 pixels/inch The resolution is set below 300 pixels/inch
Mistake 4: Borders aren’t thick enough
This is really a combination of Mistakes 1 and 2. If you want a border around the edge of your page,
they should start within the Safe Edge and extend out to the Bleed Edge. This will ensure the border
is not trimmed off.
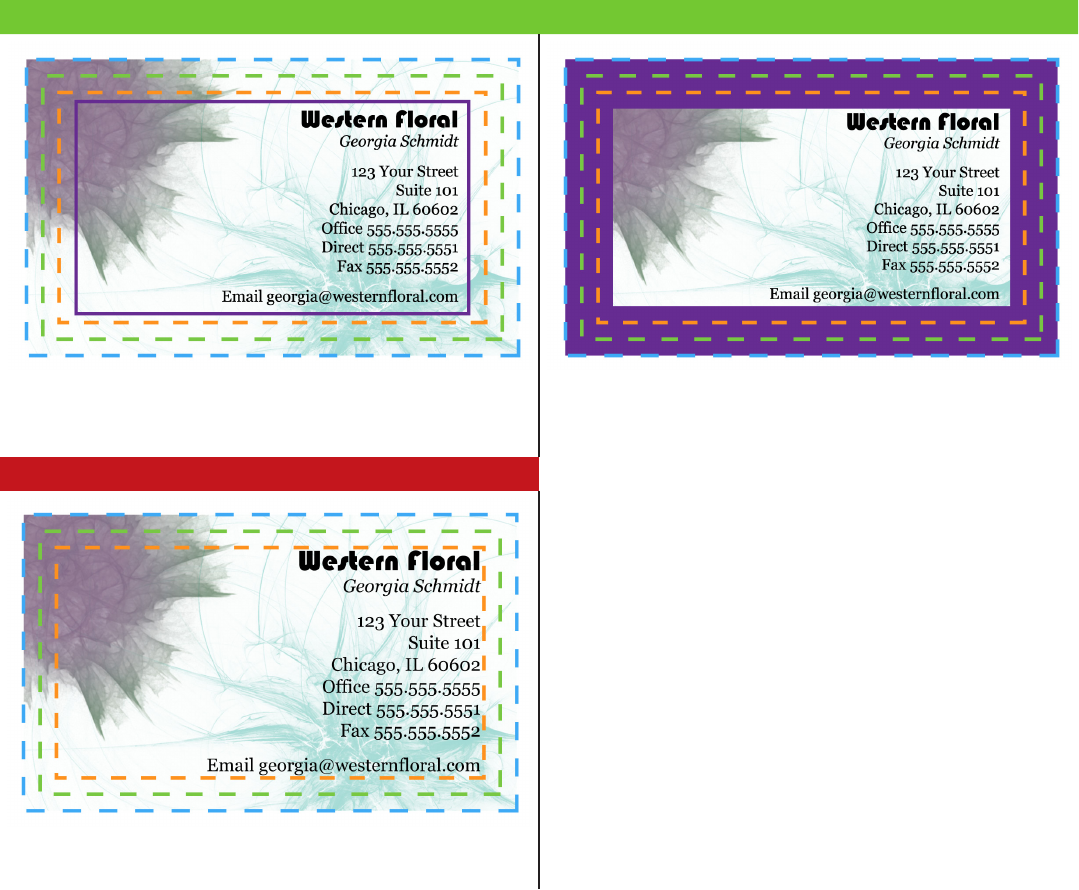
Common Mistakes in Print Design
Correct Correct
The purple border has been placed within the Safe Edge
(orange line)
The purple border has been thickened and extended from
within the Safe Edge (orange line) to the Bleed Edge (blue
line)
Incorrect
The purple border has been placed outside the Safe Edge
(orange line)
Mistake 5: Designed in RGB
Designing in RGB is appropriate for graphics that will only be displayed on screen, website graphics
for example, but is NOT appropriate for printed applications. When designing for print you should
always create or convert your images to CMYK.
Adobe Photoshop
Create file in CMYK:
1. Click File > New...
2. Set the size of your image, then select “CMYK Color” from the Color Mode drop-down menu.
Make sure your resolution is set at least 300 pixels/inch.
Convert to CMYK after design/creation of file:
1. ClickEdit>ConverttoProle...
2. Under “Destination Space” select “U.S. Web Coated (SWOP) v2”
Common Mistakes in Print Design
Adobe Illustrator
Create File in CMYK:
1. Click File > New...
2. IfAdvancedOptionsarenotvisible,clickthearrownextto“Advanced”atthebottomofthe
window
3. For Color Mode, select CMYK
Convert to CMYK after design/creation of file:
1. ClickEdit>AssignProle
2. Select“Prole”andinthedrop-downmenuselect“U.S.WebCoated(SWOP)v2
Adobe InDesign
Convert to CMYK after design/creation of file:
AdobeInDesigndefaultstoaCMYKcolorprole.ThereisnoneedtoconvertyourInDesign
documenttoCMYKortosetacolormodewhencreatingthele.However,youshouldmakesure
theworkingCMYKproleissettoU.S.WebCoated(SWOP)v2.Dothisby:
1. ClickEdit>ConverttoProle...
2. Under“DestinationSpace”selectU.S.WebCoated(SWOP)V2intheCMYKProledrop-down
menu
Mistake 6: Fonts not converted or included
WhentextiscreatedinPhotoshoporIllustratoritshouldbeattenedfornaloutput.InIllustrator
this is called “Create Outlines” and in Photoshop it is “Rasterize Type.” Text is no longer editable, but
errorsrelatedtomissingfontswhensendinglestoyourprinterareeliminated.Youcanalsocreate
outlines from text in InDesign, however this is not necessary if you Package
3
yourlebeforesending
it to the Printer.
Adobe Photoshop
1. Select the text layer in the Layers Palette
2. Click Layer > Rasterize > Type OR right-click on the text layer and select “Rasterize Type”
3. ItishighlyrecommendedyouSaveAs...toadifferentlenameafteryoucreateoutlinesasyou
will no longer be able to edit any of the text.
Adobe Illustrator
1. Select the text box
2. Click Layer > Create Outlines
3. ItishighlyrecommendedyouSaveAs...toadifferentlenameafteryoucreateoutlinesasyou
will no longer be able to edit any of the text.
Adobe InDesign
It is not necessary to Create Outlines from text in InDesign if you Package (see
Packaging in InDesign)thele(anInDesigntoolthatcollectsallfontsandlinkedimagesintoone
easy-to-send folder for your Printer).
